Automate blinds with Sonoff Dual
Part one: Install Tasmota Firmware
Last edited: 08/22/2018
The Sonoff is an electrical device that uses high voltage. If you are unsure of the operation and connection of the Sonoff, ask an expert electrician for help. I take no responsibility for the installation of electrical materials and for the suggestions provided on this page.
What is Sonoff Dual?
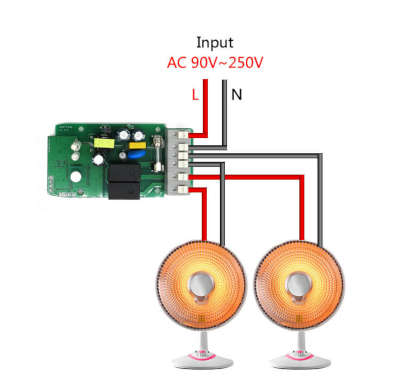
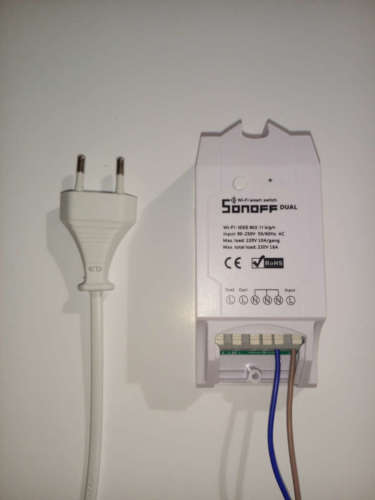
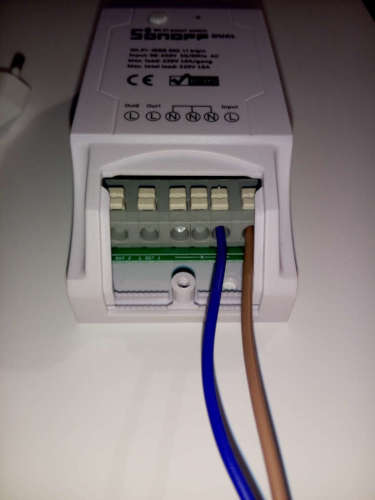
Sonoff Dual is a WiFi switch that can control two electrical devices from your smartphone. It has two input terminals that accept the line and neutral cables of the power line and four output terminals: one phase and one neutral for each device.
For example, we could connect two lights to the Sonoff outputs in order to control them separately. However the double output allows us to adopt the Sonoff Dual to control the ascent and descent of a tubular motor for shutters. Here is an example of a connection with two generic loads:
Why Sonoff Dual?
I already have electric shutters. I want to control them from my smartphone.
I already have electric shutters but they are driven by physical buttons. The Sonoff installation allows smart control via smartphone and offers the possibility of creating intelligent opening and closing scenarios: continuous opening for n seconds, automatic closing at sunset, etc. However we will later need to configure a home automation software such as Home Assistant to create automations.
I do not have electric shutters. I want to add the motors and control the shutters from my smartphone.
If your electrical system is set up for the installation of electric shutters, then you are able to roll out the necessary cables without any problem. This way you can use the physical buttons and you can decide to add the Sonoff Dual for a smart control.
Worst case: your system only has an alarm line or any line that passes through all the doors and from which it is possible to recover the power cables for the motors. In this case the best option is to use Wifi relays to control the shutters. Be careful: it is not recommended (and not legal) to use the same pipe for data cables (alarm) and 220V cables (motors). This means that one use precludes the other.
Install the Tasmota firmware
The original firmware allows immediate use of the Sonoff via the eWeLink app. However it is not suitable for use with roller shutters. The Tasmota firmware, in fact, allows to enable a software interlock that prevents the two outputs from turning on simultaneously. This is necessary to avoid damage to the engine. In addition, Tasmota facilitates integration with home automation systems such as Home Assistant.
The easiest way to install Tasmota is by using SonOTA. The installation happens through WiFi and it does not require access to the Sonoff serial pins. However this method only works if the Sonoff has a certain version of the original firmware. A version >= 1.6 is required! In order to know the version, you should configure the Sonoff on the eWeLink app and search for the device information. Aside from that, my advice is to follow the Tasmota installation procedure. If the Sonoff firmware is not suitable, the procedure will fail but you can still enjoy the Sonoff with the original firmware via the eWeLink app.
Here's how to proceed on a Windows based system:
Download sonota.exe from the release page.
Disable all firewalls on the PC.
Power the Sonoff as shown in the figure. My advice is to get a cable and open it at one end so as to perform the initial operations on the workbench rather than in the shutter box.
Connect the socket. The LED flashes slowly. Hold the button on the Sonoff for 8 seconds until the LED flashes three times consecutively. Then press the button again for 8 seconds until the LED flashes quickly. This procedure is necessary to make the Sonoff WiFi network appear.
Open sonota.exe as administrator. The wizard starts.
Select the IP address of the computer. Be careful to choose its address on the local network. To be sure, just open the command prompt and type the command "ipconfig".
In my case the address is 192.168.1.6 so I enter 0 (which is the default choice).
Enter the SSID of the WiFi network to which the Sonoff will connect. It probably is the same SSID to which the PC is connected. Press enter and type the WiFi network password. These data will be communicated to Sonoff in the following phases.
Now you need to connect to the Sonoff WiFi network which will look like ITEAD-100001XXXX. The default password is 12345678. Once connected, the PC sends the WiFi information to the Sonoff.
Connect back to the local network. The Sonoff (now connected to the local network) will download the Tasmota firmware from the PC (server).
This message will indicate the end of the download. Follow the instructions and connect the PC to the open FinalStage network.

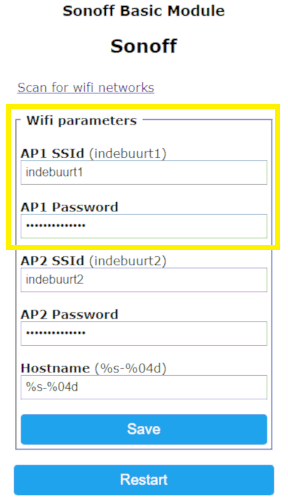
The installation concludes with a message that advises you to connect to the Sonoff network to configure WiFi. As soon as you connect to it, you will be redirected to the WiFi configuration page. Just enter the SSID and password (AP1 is sufficient) of your router to complete the Tasmota installation.
Change module type
Don't be surpirsed to read Sonoff Basic Module instead of Sonoff Dual. The Sonoff Basic is another WiFi switch that has only one output. We must therefore change the Module Type in order to obtain control of both outputs. But first you'd better update the Tasmota firmware to the latest version:
Download sonoff.bin from the Tasmota release page.
Access the Sonoff control page by typing its IP address in the browser. Click on Firmware Upgrade then select the bin file you just downloaded by clicking on Upgrade by file upload. Then click on Start upgrade and wait a few minutes while the Sonoff restarts.
The only think left is to change the Module Type. Click on Configure then Configure Module. From the drop-down menu we have two alternatives: 05 Sonoff Dual or 39 Sonoff Dual R2. Choose the second and click on Save.
We have completed the installation of the latest version of the Tasmota firmware.
Part one ends here. In part two we will see how to install Home Assistant on a Raspberry Pi and how to integrate the Sonoff into the home automation system.